
LinkedIn job search tricks that actually save time
Sort by recency, use the hidden time filter, write Boolean searches, skip reposted listings and keep a real tracker. Plus how JobWhat speeds up the busywork.
7 min readJobWhat Team
- Job search
- Productivity
LinkedIn is where most people start a job search, and it is also where a lot of time quietly disappears. The same listings show up in every search, promoted posts float to the top, and a job that looked fresh turns out to be three weeks old with 900 applicants. None of that is a reason to stop using LinkedIn. It is a reason to use it more deliberately.
Below are the settings and habits that make the biggest difference, followed by how JobWhat, our Chrome extension, handles the repetitive parts.
1. Sort by most recent, every time
LinkedIn's default sort is "Most relevant," which mixes in older and promoted listings. Switch the sort to Most recent on every search. Early applicants are more likely to be read by a person before the pile gets large, so seeing new posts first is the single cheapest improvement you can make.
2. Use the time filter in the URL
The Date posted filter offers "Past 24 hours," "Past week" and "Past month." When you pick one, LinkedIn adds a parameter to the address bar called f_TPR. Its value is the window in seconds, prefixed with r:
f_TPR=r86400is the past 24 hoursf_TPR=r604800is the past weekf_TPR=r3600is the past hour
LinkedIn does not offer "past hour" in the menu, but editing the number in the URL works for many people. You can also try r14400 for the past four hours. LinkedIn does not document this, so treat it as a handy shortcut that could change, not a guarantee. Bookmark a few of these URLs for your core searches and you can check for brand-new roles in seconds.
3. Write Boolean searches
The keyword box accepts Boolean operators, which lets one search replace five:
- Quotes for exact phrases:
"product designer"will not match "product manager who works with designers." - OR for alternatives:
"data analyst" OR "analytics engineer" - NOT to exclude noise:
"software engineer" NOT senior NOT staff - Parentheses to group:
("customer success" OR "account manager") NOT sales
Write the operators in capitals. Start broad, look at what comes back, then add a NOT for each kind of listing you keep skipping.
" "Exact phrase"product designer"Only that phrase, in that order.
OREither term"data analyst" OR "analytics engineer"One search covers both titles.
NOTExclude"software engineer" NOT seniorDrops listings with the word.
( )Group("customer success" OR "account manager") NOT salesCombine OR and NOT safely.
r3600Past hourr14400Past 4 hoursr86400Past 24 hoursr604800Past week4. Decide how you want to apply: Easy Apply or company site
The Easy Apply filter shows only jobs you can apply to inside LinkedIn. It is fast, which also means those listings attract a lot of applicants. Jobs that send you to the company's own site take longer, and that friction thins the field. Many of those company sites run on applicant tracking systems like Greenhouse, Lever, Ashby or Workday.
Neither route is better in every case. It helps to be intentional: use Easy Apply for quick volume on roles that are a clear fit, and spend your careful effort on company-site applications where fewer people finish the form.
5. Look for "Under 10 applicants"
Under All filters there is an Under 10 applicants option. Combined with a recent time filter, it surfaces roles where you can still be one of the first people in the queue. The count is LinkedIn's number, not the employer's, so it misses people who applied on the company site. It is still a good signal of how crowded a posting is.
6. Save searches and turn on alerts
Once a search is dialed in, scroll to the bottom of the results list and turn on the Set alert toggle there. It sits below the job cards, not at the top of the page, so it is easy to miss. You can choose how often LinkedIn notifies you. Daily alerts plus a quick manual check of your bookmarked "past 24 hours" URL covers most roles within a day of posting.
Keep a small number of sharp alerts rather than a dozen vague ones. If an alert keeps sending irrelevant jobs, tighten its keywords with the Boolean tricks above.
7. Check the hiring team and reach out
Many postings show a Meet the hiring team section with the recruiter or hiring manager. If it is there, send a short, specific message after you apply. Two or three sentences is enough: the role, one concrete reason you fit, and a link to relevant work. Generic "I'd love to connect" notes are easy to ignore. A note that references something real about the team is not.
If there is no hiring team listed, look up the company's recruiters or the manager for that function. Keep it brief and polite, and do not follow up more than once or twice.
8. Skip promoted and reposted listings when time is short
Listings marked Promoted are paid placements. They are not bad jobs, but they are not necessarily new or relevant either. Listings marked Reposted have usually been open for a while. A repost can mean the role is still unfilled, which is worth knowing, but it also means the applicant pool is large. When your time is limited, give fresh, organic listings your attention first.
9. Track what you applied to
LinkedIn's My Jobs page keeps saved jobs and jobs you applied to through LinkedIn. When you apply on a company site, LinkedIn may ask whether you applied so it can move the job into your applied list. It is a start, but it only knows about LinkedIn, and it has no notes, reminders or statuses of your own. A real tracker, even a spreadsheet, saves you from reapplying to the same role or forgetting to follow up.
Where JobWhat fits in
Everything above is about finding the right jobs quickly. The part that eats the rest of your time is the clicking: opening the same listings again, keeping a list of what you applied to, and retyping your history into application forms. That is what JobWhat is for.
Controls on every job card. On LinkedIn (and Indeed) results, JobWhat adds small buttons under each job: + to log it, − to hide it, a watch button to save it for later, and on LinkedIn a ≡ button to add it to your apply queue. Cards colour themselves as you go: yellow for viewed, green for applied, blue for queued, and hidden jobs stay out of your way on every future search. Jobs already in your log get a chip such as "Applied · 3d ago," so you never apply twice by accident. Batch buttons can mark the rest of a results page as viewed or hidden, or watch every visible job, once you have picked out the ones you want.
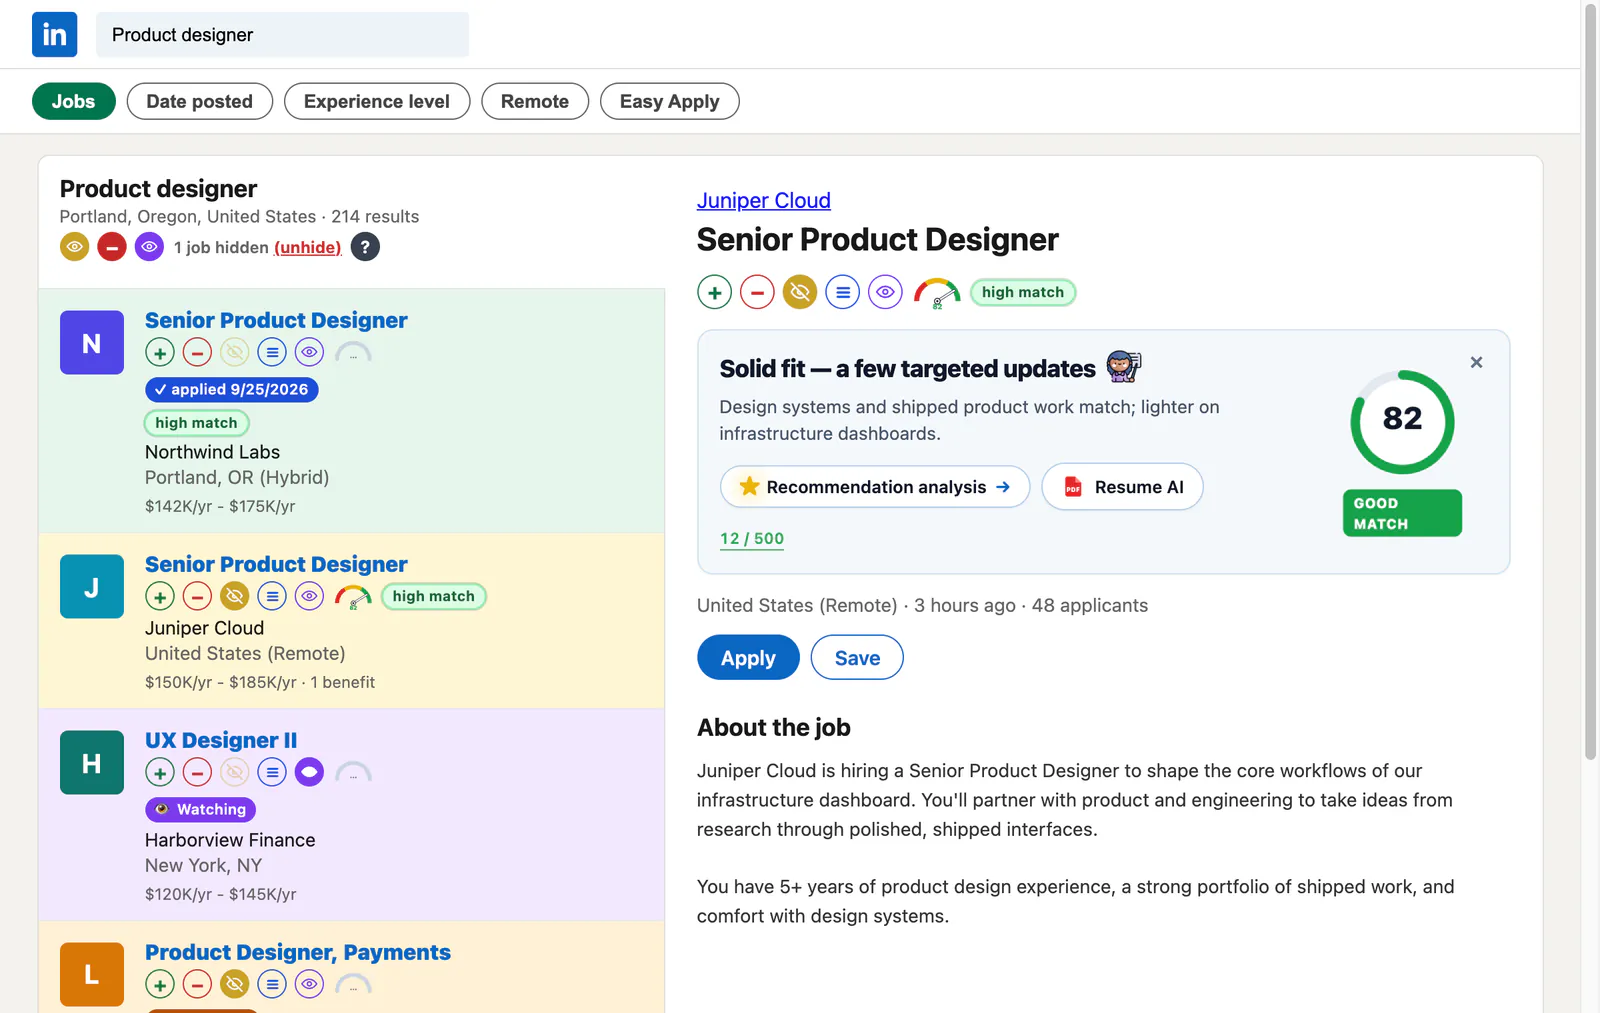
An apply queue for company-site jobs. Press ≡ on a LinkedIn job and JobWhat opens the posting in a background tab, follows the company's Apply link and fills the form on Greenhouse, Ashby, Lever or Gem. On Greenhouse, Lever and Ashby, Auto Submit (on by default; you can turn it off in Settings) presses Submit when every field is filled and nothing needs review. Otherwise the run ends as Hit Submit with the tab left open, and the status pulses green when every required field was filled or red when some need you. Easy Apply and Workday jobs are not queued; the log tells you why.
- Step 1ViewOpen a card; it turns yellow so you skip it next time.
- Step 2Hide, watch or queue− hides it everywhere, the eye watches it, ≡ queues it.
- Step 3JobWhat fillsA background tab follows Apply and fills Greenhouse, Ashby, Lever or Gem.
- Step 4SubmitComplete Greenhouse, Lever and Ashby forms with nothing to review are auto-submitted; others stop at Hit Submit for you. The card turns green.
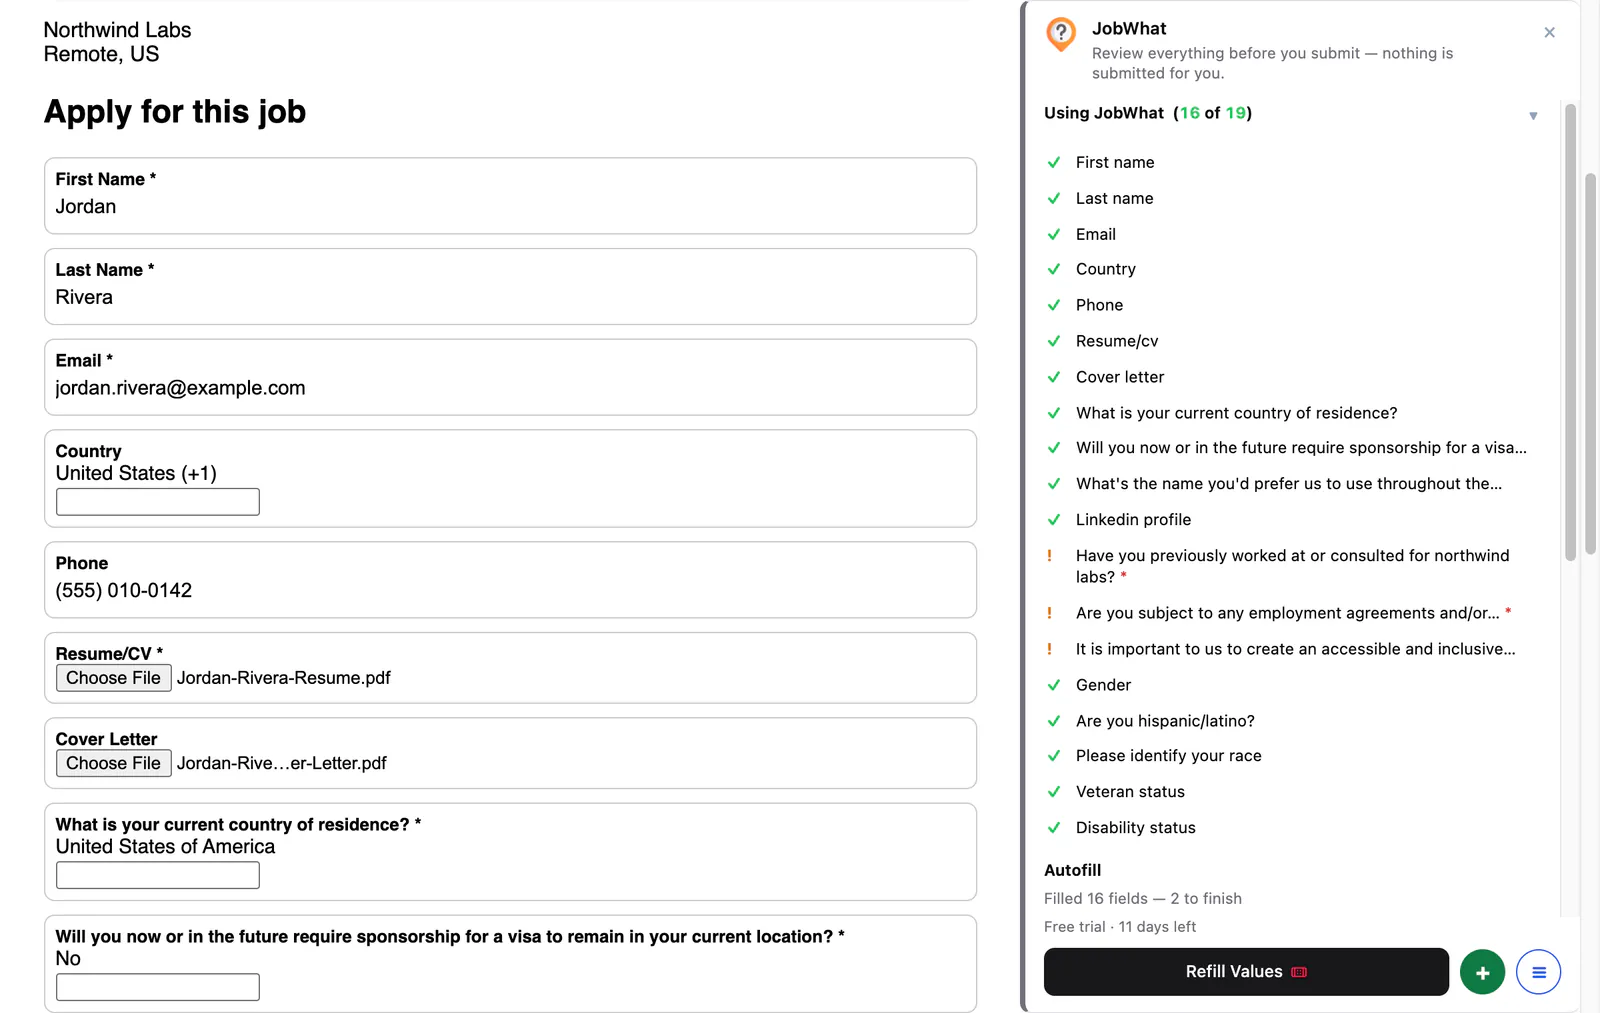
Autofill on six applicant tracking systems. Open an application on Greenhouse, Ashby, Lever, Workday, Gem or Rippling and press Autofill. JobWhat fills contact details, links, work authorization, education, self-identification answers and your resume from a profile you set up once. On Workday it handles one wizard step per click. Anything it cannot answer is listed so you can finish it yourself, and you always review and submit.
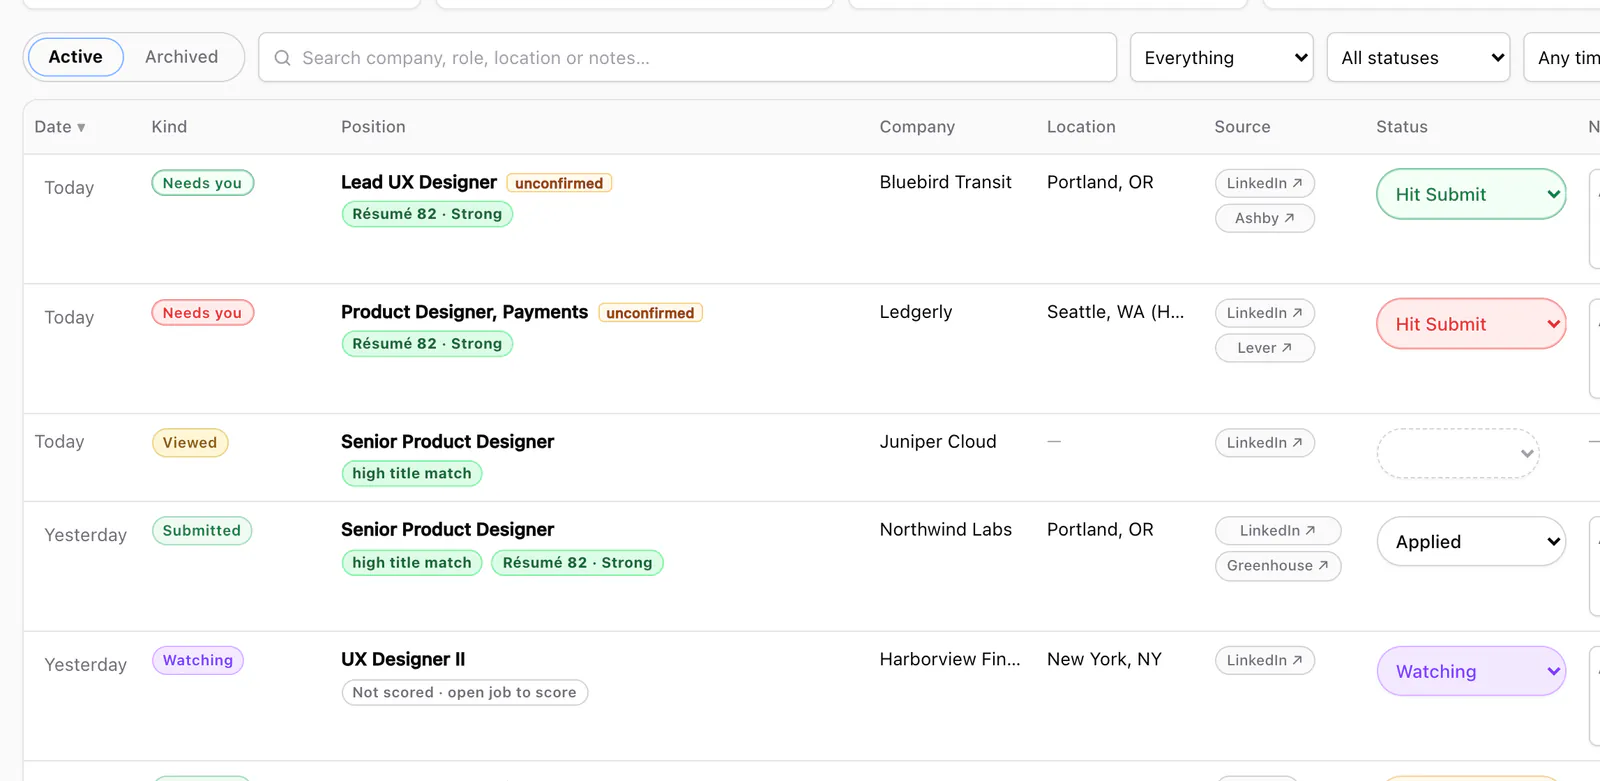
One job log. Applied, watched, viewed, hidden and queued jobs live in one searchable log with your own statuses, notes, reminders and CSV export. When JobWhat knows a job's apply link, the log shows a chip naming the applicant tracking system (for example Greenhouse or Lever) that opens the company's apply page.
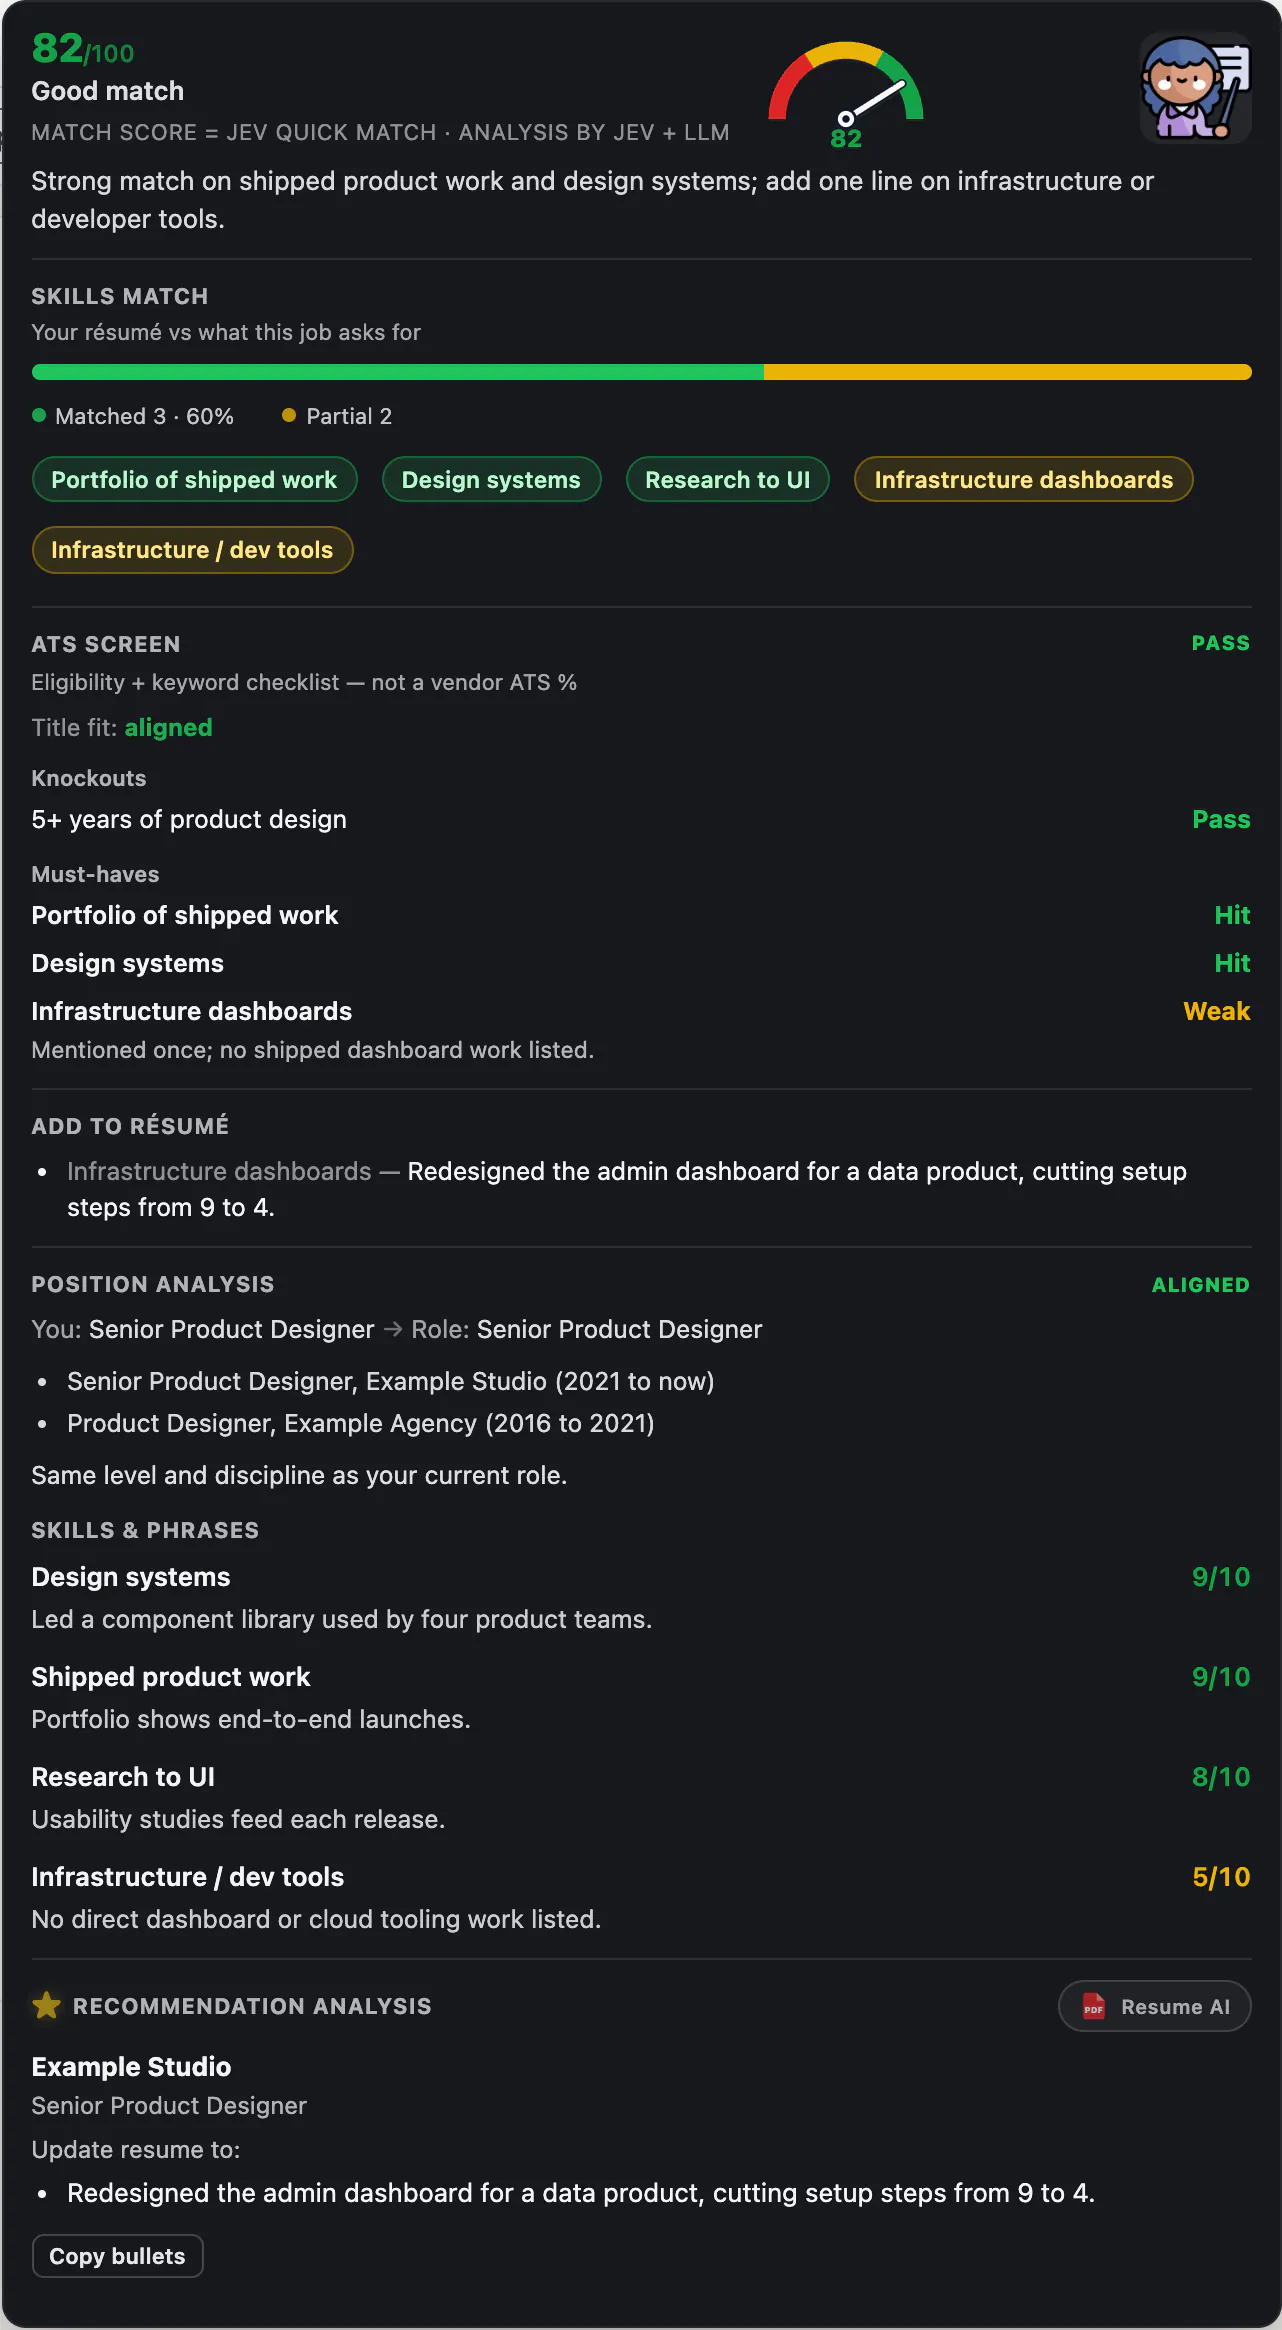
AI resume analysis. You can score a posting against your resume before you apply: a 0 to 100 match, how your recent titles line up with the role's level, each requirement scored against your resume, and suggested bullet updates you can copy. It is opt-in, and it sends the job description and a text summary of your resume to an AI model to produce the score.
What is free and what is Pro. Every install gets all of Pro free for 14 days, no card and no account. After that, the job log and export stay free, with a monthly allowance of 20 autofills, 20 queued jobs, 100 views, hides and watches, and a one-time amount of AI to try it. Pro ($9 a month or $49 a year in most regions) raises those limits, makes views, hides and watches unlimited, and adds AI answers for odd application questions. Your profile, resume and job log are stored in your browser, and your data is never sold.
The short version
Sort by most recent, bookmark a "past 24 hours" search, write Boolean keywords, favor fresh organic listings, and message the hiring team with something specific. Then let a tool handle the busywork so your energy goes into the applications that matter.
Add JobWhat to Chrome and try it free for 14 days.